Tuesday 3 September 2013

Knitting Magazine- Zig Zag Cushion pattern giveaway amendment

Well we all slip up occasionally.......this month its the turn of Knitting Magazine who in their feature on my book The Knitted Home have misprinted the featured pattern......Oops! 

But dont panic- its very simple to sort out- they have simply missed a line of text- instead of just 'repeat rows 3-12' it should read;
'Row 3-16 is one repeat. Do 3 more full repeats. Then repeat rows 3-12'

Phew! And apologies to all the baffled knitters out there- one of whom was Janet- who after a quick email to me whizzed up this lovely example- Well done Janet!

The Knitted Home in Waterstones Piccadilly!

Thankyou to my lovely friend Anya who spied this in Waterstones on Piccadilly..............(pink writing- right in the middle- THE KNITTED HOME)... still so crazy its a real book!

Cable Cushion Success From Knits At Home!

Thankyou so much for your latest update Jane Parker! I feel like a proud mother hen!

See what wondrous goodies Janes been making with help from my book Knits At Home/ The Knitted Home..........
The cushion above is one she has developed with the help of the section in the book that explains how to design your  own cushion with cables and the floor cushions below use the more general 'how to work out your own pattern' guidance- arent they all gorgeous- and I'm totally jealous of your beautiful house too!!!!
Janes Letter about the above......

Hi Ruth, 
How are you?

I forgot to take a photograph of the second finished cushion cover I knitted before mailing it overseas to my Mother in England. I did however take this photograph of it before it was sewn up and finished with steam.
It is just 'wrapped' around one of my other cushions to give the effect of it being finished. I am really pleased with how it turned out and already feel more comfortable sketching out and making up patterns. - It also didn't take too long (thankfully) to figure out what would still look good but be less complicated to knit. i.e. making sure that all my purl lines were straightforward and I could quickly knit them up without too much concentration !

I also wanted to show you a couple of my other projects.
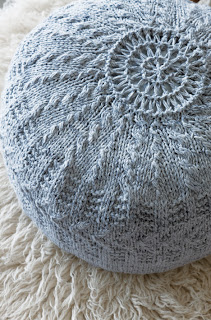
These were inspired by the sea urchin style floor cushions I see in many of the Homes and Interiors magazines.
Again, I don't like the idea of simply copying other people's work but I wanted to see if I could figure out how to make them.

The larger one is made with 12 strands of yarn which I had to crochet into a chain link before putting it into the washing machine on a hot wash a few times to felt the wool together into a thick woollen rope.
Then I knitted it up (trial and error with the pattern) on giant needles that I made myself by transforming two 4cm thick dowelling rods purchased from my local hardware store.
With the amount of wool, hot water and hard work involved (I had to kneel on the floor to knit because everything was on such a large scale), I think it will be a while before I make another.

I am currently working on the chair pad cover you have in your book and am happy with how it is turning out.
The only thing is; I feel the need to be more original, so as I'm knitting away I can't stop trying to thing of my next project !!!

As always, thanks for everything.
Regards,


Monday 17 June 2013

The Knitted Home- Cabled Bolster Cushion Success!

So this morning I found a lovely email from Jane who bought The Knitted Home and has not only created her own version of the cabled bolster cushion but is spinning her own yarn and will be adapting more patterns for her own yarn- Go Jane! This is exactly what I hoped people would be able to do with the book- Huzzah!


Hi Ruth,

Well this is my first attempt at a cushion inspired by yours.

I tried to just look at the designs you had created in your book to figure out what you must have done to achieve each cable effect as I didn’t want to simply ‘copy’ your pattern if I could help it.

This cushion was knitted with hand spun wool I had purchased from a lady who was retiring from her homespun wool business. (I was too impatient to start right away and didn’t have enough of my own yarn spun ready to start that quickly) !
I have ‘found’ some off white Merino wool that I had forgotten I had so that will be cushion # 2 with perhaps a few modifications to my initial design.

I also can’t thank you enough for the section in your book about finishing with steam. What a difference that makes !

Thanks again for everything Ruth.
You have inspired me so much to explore and design my own style of knitting, which I didn’t feel confident enough to do beforehand.

If I manage to go from strength to strength I’ll keep you posted.

Jane.

To order your own copy go to www.amazon.co.uk (The Knitted Home- English/ Australian title) or www.amazon.com (Knits At Home- North American title). It is also available in French, Finnish and German.

Monday 27 May 2013

The Knitted Home; Geometric Cable Blanket- not as hard as it looks?

I was absolutely the most thrilled girl in the world to get back from holiday and find the most lovely email (see below) in my inbox....... it's so great to have inspired someone to crack on with their knitting! 
Go Gabrielle!!


Dear Ruth,

You kind advice and geometric throw instructions from your new book inspired me to knit this sample. 
Can't wait to get started on the larger project.

Being a beginning knitter, this was a fun project.  Learned  how to do cables.

Warmest Regards,

Gabrielle


Rhubarb at the Royal Albert Hall- cosy tableware- Done!

The lovely people at Rhubarb- the new Royal Albert Hall restaurant are getting their shipment of cosy tableware today ahead of opening night on Thursday! Good luck everyone!
Thankyou Linda Bloomfield for arranging this and making fabulous tableware once again xxx


Monday 13 May 2013

The Knitted Home- X pattern cushion/ pillow help and advice!

So- all is going well with the book with lots of lovely reviews popping up around the place, however I have had a few baffled e-mails from knitters regarding the X pattern cushion/ pillow and I assume by default the zig zag one is also causing confusion.....!

Both of these rely entirely on the Knit/ Purl Basket technique so getting this right is essential to cracking the pattern....and I wasn't kidding the X pattern is a lot harder (because of the swap over in the middle) than the Zig Zag so do the Zig Zag first!!!
First things first is double check your basic knit and purl stitches against how I do them- some of the patterns it makes no  difference how you knit and purl but this one it really does. 
Knitting: Make absolutely sure you are inserting your right needle through the centre of the stitch you are knitting and out the back. Then take your yarn (behind the work) from right to left around the outside of the right needle then back between the needles before pulling it through as a stitch. 
Purling: Insert your right needle through the centre of the stitch and out the front. Take your yarn towards you around the outside of the needles and back between the two.
With any luck the pictures at the back of the book should help a bit to double check this!
So......
Knit basket: you need to knit the second stitch then the first and slip both off together. To do this take your right needle around the back of the work and insert it from right to left under the back of the second stitch- take the yarn round and pull the stitch through as described above. Then before you pull it off the needle do the same with the first stitch- slip both off together.
Purl Basket: Do the exact opposite of the Knit basket- so insert your right needle from right to left under the front of the second stitch- take yarn round and pull stitch through as described above, then do the first stitch and pull them off together.
And then......
Some people seem to have a bit of bother with reading the pattern. A knit basket is KB and purl basket PB. These abbreviations refer to the whole technique using both stitches as described above, so K1 KB uses 3 stitches. For the X Pattern one I would also put a stitch marker in over the central stitch as once you get going with your baskets it's quite easy to do too many!

I'm going to try and work out how to do a little film of my hands doing this and upload it- in the meantime please don't hesitate to email me if it's still baffling!
xxxx
PS any successful ones please send pictures!!!!!

Thursday 25 April 2013

The Knitted Home- what yarns are used....

I recently got an email from a prospective reader asking the following;

'I'd like to buy your book but would like to know what yarns are used, where I can find them and how I can see more images of the projects before placing an order?'

And my answer was....

The yarns are a selection from Rowan, Debbie Bliss and Coats- they should be readily available near you or online. I have tried to use a variety of differently priced yarns as I'm aware how expensive some hand knit yarns are and didn't want to just make super expensive items. 
That said I think many of the yarns would be easy to swap with other makes/ fibre content if you wanted to do that and throughout the book I have tried to inspire and guide people to create their own patterns or adapt existing ones, so this may also help you change the yarn if you need to!
Regarding seeing more images I'm not sure what you've seen so far but if you look up 'The Knitted Home' on www.amazon.co.uk it has quite a good 'look inside' feature with a list of patterns as well as some images- there are also a few more on my blog so I hope that helps a bit too!    http://ruthcross.blogspot.co.uk/

Happy Knitting!
Xx

Monday 22 April 2013

The Knitted Home- guidance for cabled cushion with no pattern.....

Now the book is out there and on sale, I'm thrilled to report that I'm gettting emails from lots of people who are thoroughly enjoying it- as well as the occassional one needing a bit of help.... so I thought I'd publish those just in case other people have the same question!

'How do I make the cabled cushion on the sofa which doesn't have a pattern.....?'


This cushion is featured on the sofa on the cover of the North American/ Australian edition and in the centre of the sofa on page 48/49.

This cushion was created as part of the set on page 48/49 where it is the centre cushion included to illustrate cables as a design technique. A really big part of my intention in writing this book was to try and inspire knitters to develop their own patterns rather than just providing a set of patterns to follow, which is why no pattern is included here. Throughout the book there are several pieces shown with no pattern and several patterns that are adaptable for the individual, as well as guidance on how to develop unique designs from scratch. Although the pattern for this cushion isn't included, all the cables that are used are also on the cable bolster cushion- this is used as an example of how to plan a cover with various cables on it (bolster cushion p68, guidance on designing with different stitches on one piece p141/ 142). If you've done a few cables before and take a bit of time to work out your stitches I'm sure you will be fine creating your own version of this cover- I'm on maternity leave so don't have the pattern in front of me but from looking at it the cables are laid out as follows:

From right to left as if working across a row (I always try to make cables on a knit row so you can see what you're doing)
4st cable (sl 2st to cn, hold in front, k2, k2 from cn. Cable every 4 rows)
Bird Cable
4st cable (as before but hold in back)
12st cable (sl 6st to cn, hold in back k6, k6 from cn. Cable every 12 rows)
12st cable (as above but hold in front)
4st cable (as before, hold in front)
8st cable (sl 4st to cn, hold in back k4, k4 from cn. Cable every 8 rows)
8st cable (exactly as above)
8st cable (as above but hold in front)
4st cable (as before, hold in front)
3st basket detail - on the knit side you do k1, KB, on the purl side you do p1 PB. This is the smallest cable possible.
I will have added an extra stitch at each end to start and end the row with- the first will have been slipped at the start of each row and the end stitch worked as normal to give a nice edge.

Because all the cables are made on rows that are multiples of 4 you'll find keeping track of when you make the cable for each one fairly easy once you get going. I would have a go using a yarn like the Debbie Bliss Rialto Chunky on some 6mm needles as this is about the same weight as the yarn we used- (see the zig zag and X patterns for something made in this). If you make the front and measure it as about 36cm square then you can use the back pattern from these cushions for yours too- if its a bit smaller/ bigger then you'll need to adjust it a bit.

I hope this helps!!!!!!

Finally! A long awaited blog update and images from The Knitted Home!

I've finally been able to emerge from the baby haze (lovely Beatrix was 3 months on Friday!) long enough to update my blog which is in dire need of attention. I have a list of things to add as long as my arm but to start with here are some images from The Knitted Home- my first book of which I'm very proud x

This is the cover used on the English and Finnish editions (above).

This is the cover used on the Australian edition and the same image is used for the North American edition but the title is Knits At Home- so each country's is slightly different!


You can buy the book at www.amazon.com or ask at your local bookstore.....

Tuesday 26 February 2013

Coral-blob-moss piece FINISHED!!!!


About a million years late and I've finally finished the piece for Woolmarks London showroom..... with a lot of help from my trusty knitters Karen, Sally and Brenda and several hundred 'blobs' later- I hope you'll agree it was worth it in the end.......I'm assured they like it!!!!!!


1 metre square piece for Woolmark x